- Welcome to HostNed Community.
HostNed Community
Help And Support Forums
News:
Go to HostNed.com Home
Welcome. This is a place to get user-to-user support, learn more, and share ideas. If you can't find your answers here, feel free to ask by creating a new topic or visit the support ticket system at https://my.hostned.com  Have fun here!

 Recent Topics
-
How To Install and Get Started with WooCommerce on WordPress
by Dynaweb
[January 12, 2026, 04:21:12 PM] -
Learn-To-Code vs Vibe Coding Using AI
by Dynaweb
[January 12, 2026, 01:40:57 PM] -
Why Is My Hosting Account Suspended?
by Dynaweb
[June 28, 2025, 10:59:46 AM]
Recent posts
#1
WordPress / How To Install and Get Started...
Last post by Dynaweb - January 12, 2026, 04:21:12 PMWooCommerce is the most popular eCommerce plugin for WordPress, allowing you to sell physical products, digital downloads, subscriptions, and more — all directly from your website.
This guide walks you through installing WooCommerce and completing the essential first-time setup so you can start selling confidently.
Requirements Before You Begin
Before installing WooCommerce, make sure you have:
Step 1: Install the WooCommerce Plugin
Step 2: Complete the WooCommerce Setup Wizard
The setup wizard helps configure your store's basics. You can skip steps and return later if needed.
Store Details
Step 3: Configure Payments
WooCommerce supports many payment gateways. Common options include:
Step 4: Configure Shipping
If you're selling physical products:
Step 5: Configure Taxes (Optional)
WooCommerce can automatically calculate taxes:
Step 6: Add Your First Product
Step 7: Test Your Store
Before launching publicly, test everything:
Helpful WooCommerce Settings to Review
Common Beginner Mistakes to Avoid
When to Consider Professional Help
You may want expert assistance if:
Need Help?
If you're hosting with HostNed and need assistance:
This guide walks you through installing WooCommerce and completing the essential first-time setup so you can start selling confidently.
Requirements Before You Begin
Before installing WooCommerce, make sure you have:
- A working WordPress installation
- Administrator access to the WordPress dashboard
- PHP 8.1+ recommended (7.4 minimum, though newer is better)
- HTTPS enabled (SSL certificate required for payments)
- A theme compatible with WooCommerce (most modern themes are)
Step 1: Install the WooCommerce Plugin
- Log in to your WordPress admin area
Code Selecthttps://yourdomain.com/wp-admin - Navigate to:
Plugins → Add New - In the search box, type:
WooCommerce - Click Install Now next to "WooCommerce" (by Automattic)
- After installation completes, click Activate
Step 2: Complete the WooCommerce Setup Wizard
The setup wizard helps configure your store's basics. You can skip steps and return later if needed.
Store Details
- Store address
- Country and state
- Currency
- Product type (physical, digital, both)
- Choose your store category
- Select what you plan to sell (physical products, downloads, subscriptions, etc.)
- Approximate number of products
- Whether you're already selling elsewhere
- WooCommerce may suggest a theme
- You can keep your current theme if it's already compatible
Step 3: Configure Payments
WooCommerce supports many payment gateways. Common options include:
- PayPal
- Stripe (credit/debit cards)
- Offline payments (cash on delivery, checks, bank transfer)
- Go to WooCommerce → Settings → Payments
- Enable the gateways you want
- Click Manage to configure API keys and options
Step 4: Configure Shipping
If you're selling physical products:
- Go to WooCommerce → Settings → Shipping
- Add Shipping Zones (e.g., United States, Canada, International)
- Assign shipping methods:
- Flat rate
- Free shipping
- Local pickup
- Set shipping costs per zone
Step 5: Configure Taxes (Optional)
WooCommerce can automatically calculate taxes:
- Go to WooCommerce → Settings → General
- Enable Tax calculations
- Save changes
- Configure tax rules under WooCommerce → Settings → Tax
Step 6: Add Your First Product
- Go to Products → Add New
- Enter a product name and description
- Set the price
- Choose:
- Simple product
- Variable product (sizes, colors, options)
- Upload product images
- Click Publish
Step 7: Test Your Store
Before launching publicly, test everything:
- Add a product to cart
- Go through checkout
- Test payment methods (use sandbox/test mode)
- Confirm order emails are delivered
- Verify shipping and taxes
Helpful WooCommerce Settings to Review
- Accounts & Privacy: customer accounts, checkout options
- Emails: order confirmations, admin notifications
- Permalinks: ensure "pretty URLs" are enabled
- Backups: always recommended for eCommerce sites
Common Beginner Mistakes to Avoid
- Skipping SSL (payments will fail or be blocked)
- Using outdated themes or plugins
- Installing too many WooCommerce extensions at once
- Forgetting to test checkout before launch
When to Consider Professional Help
You may want expert assistance if:
- You need custom product logic or pricing
- You're integrating third-party systems
- You expect high traffic or large catalogs
- You're migrating from another eCommerce platform
Need Help?
If you're hosting with HostNed and need assistance:
- Installing WordPress
- Verifying SSL
- Optimizing performance
- Troubleshooting WooCommerce issues
#2
Scripting / Learn-To-Code vs Vibe Coding U...
Last post by Dynaweb - January 12, 2026, 01:40:57 PMI do some coding, keeping up on things over the past couple decades; mostly PHP and dabbling in Javascript. Over the holidays I was chatting with a younger family member and he was excited to express to me that he was "learning to code" (Javascript) by taking intensive online courses. He was soliciting me for advice asking what I recommend to him to make his learning experience the best it can be.
I hope he didn't see it in my eyes, but my knee-jerk though was to tell him, "Just let AI code for you!", but thankfully my wiser side prevailed. After thinking for a moment, I told him to be sure to master the LOGIC and CONCEPTS of the coding process, more so than the syntax. That way when using an AI assistant to expand or augment or troubleshoot his own work, he will have the vantage of an executive commanding resources while maintaining vision within context of the overall project.
Just thinking that this avenue will be more successful than those attempting to "vibe code", with unreasonable expectations.
What do you think? Just learn to pure code, code and have AI help with specific aspects, or vibe it?
#3
Accounts General / Why Is My Hosting Account Susp...
Last post by Dynaweb - June 28, 2025, 10:59:46 AMExperiencing an "Account Suspended" message on your website? Don't panic! This article explains the most common reasons for account suspensions on HostNed's platform and what you can do to quickly resolve the issue.
Common Reasons for Suspension
How To Resolve a Suspension
What Happens During Suspension?
How To Prevent Future Suspensions
Still Need Help?
We're here for you! Visit our support contact form here
or open a support ticket and we'll assist you promptly.
Common Reasons for Suspension
- Overdue Invoice: The most frequent reason. If your payment didn't process on time, the system may automatically suspend your hosting.
- Exceeded Bandwidth or Disk Quota: Your website may have grown or experienced a traffic spike that exceeded your plan's limits.
- Malware or Hacked Files: If malicious scripts are detected, the account may be suspended to prevent damage or blacklisting.
- Spam or Email Abuse: Sending unsolicited or mass email can trigger automatic suspension due to abuse prevention policies.
- Violation of Terms of Service (ToS): Activities such as hosting pirated content, phishing pages, or other prohibited material.
How To Resolve a Suspension
- Check for Email Notices: We usually send an email with the reason and next steps. Look in your inbox and spam folder.
- Log in to the Client Portal: Visit https://my.hostned.com/ to check your billing and account status.
- Contact Support If Needed: If you're not sure why your account is suspended, please open a support ticket and we'll be happy to clarify.
What Happens During Suspension?
| Service | Effect |
| Website | Displays a suspension notice |
| May stop working (especially if DNS is affected) | |
| FTP / File Access | May be limited or disabled |
How To Prevent Future Suspensions
- Enable auto-pay or set calendar reminders for upcoming invoices
- Keep your billing and contact info up to date
- Monitor bandwidth and disk usage in cPanel or Plesk
- Secure your website and keep software/plugins updated
- Avoid sending bulk email or use verified mail services for campaigns
Still Need Help?
We're here for you! Visit our support contact form here
or open a support ticket and we'll assist you promptly.
#4
Domain Names and DNS / Your Domain Name Renewal Optio...
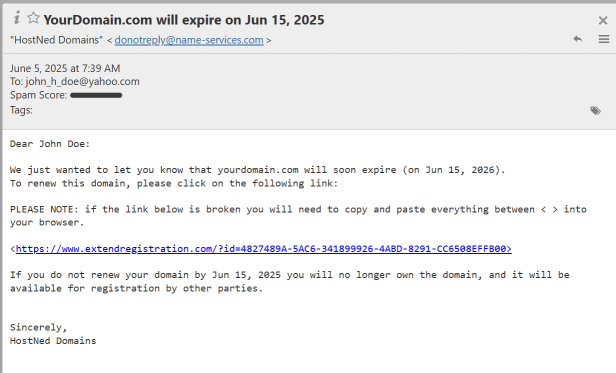
Last post by Dynaweb - June 05, 2025, 03:11:42 PMFor those who have domain names registered with us, you may occasionally receive an email regarding the upcoming renewal of your domain name (e.g.,
yourdomain.com).
These emails typically come with a subject line similar to: "YourDomain.com will expire on [Date]" and include a renewal link.
We understand these emails can sometimes cause confusion, so we want to clarify how your domain renewals are handled with HostNed.
Why You Receive These Emails:
HostNed partners with an upstream provider to provide seamless domain registration services. While we manage your domain billing directly through your HostNed client portal (https://my.hostned.com), our system sends out these automated notices to ensure you are well-informed about your domain's expiration date.
How to Be Assured This Email is Genuine (and Not a Scam):
It's wise to be cautious about emails concerning domain renewals, as malicious actors often send fake ones to trick you into paying for services you don't need or to steal your information. Here's how you can verify the legitimacy of the renewal notice you receive:
The Important Part: Your Renewal Options
You have two ways to renew your domain name:
What You Need To Do:
Important Reminders:
We aim to make your domain and hosting management as smooth and secure as possible. If you have any questions about these renewal notices or need assistance renewing your domain, please don't hesitate to contact our support team.
yourdomain.com).
These emails typically come with a subject line similar to: "YourDomain.com will expire on [Date]" and include a renewal link.
We understand these emails can sometimes cause confusion, so we want to clarify how your domain renewals are handled with HostNed.
Why You Receive These Emails:
HostNed partners with an upstream provider to provide seamless domain registration services. While we manage your domain billing directly through your HostNed client portal (https://my.hostned.com), our system sends out these automated notices to ensure you are well-informed about your domain's expiration date.
How to Be Assured This Email is Genuine (and Not a Scam):
It's wise to be cautious about emails concerning domain renewals, as malicious actors often send fake ones to trick you into paying for services you don't need or to steal your information. Here's how you can verify the legitimacy of the renewal notice you receive:
- Check the Sender Address: Genuine renewal emails from our registrar will come from a domain directly associated with domain registration, often
extendregistration.com
ordomainrenewals.com
. While the "From" name might appear as "HostNed Domains," always check the full sender email address to ensure it's not from a suspicious or unfamiliar domain (e.g.,renewals@your-domain-support.xyz
). - Look for Your Specific Domain Name: Legitimate notices will always clearly state your specific domain name (e.g.,
yourdomain.com
) in the subject line and within the email body. Generic "Your Domain" messages are a red flag. - Verify the Expiration Date: Cross-reference the expiration date mentioned in the email with the date shown in your HostNed client portal (https://my.hostned.com).
- Hover Over Links (DO NOT CLICK SUSPICIOUS LINKS!): Before clicking any links, hover your mouse cursor over them (on a desktop computer) to see the actual URL. A legitimate link for renewal from our registrar will typically start with
https://www.extendregistration.com/
or a similar official domain. If the link points to a strange or unrelated website, it's likely a scam.
The Important Part: Your Renewal Options
You have two ways to renew your domain name:
- Through the Link in the Genuine Email (Direct with Registrar): A genuine email from our registrar will include a link (like
https://www.extendregistration.com/...
). If you click this link and complete the payment, your domain will be renewed directly through our registrar. This is a valid way to renew your domain. - Through Your HostNed Client Portal (Recommended): We strongly recommend renewing your domain directly through your HostNed client portal at https://my.hostned.com.
- Consolidated Billing: This allows you to manage and pay for all your HostNed services (hosting, domains, etc.) in one convenient place.
- Automated Invoicing: If you have auto-renewal set up for your services with us, your domain renewal will typically be included in your regular HostNed invoices, simplifying the process.
- Easier Management: All your service details and billing history remain consolidated under your HostNed account.
What You Need To Do:
- If you prefer to pay through your HostNed portal: Simply disregard the payment link in the email from
extendregistration.com
(or similar legitimate registrar notice). An invoice for your domain renewal will be generated in your HostNed client portal at https://my.hostned.com closer to the expiration date. Please ensure your billing information there is up-to-date. - If you choose to pay via the provided link in the email: Your domain will be renewed, and we will be notified by our system. No further action is required from your HostNed portal for that specific renewal.
Important Reminders:
- Do not ignore renewal notices: Whether through the email link or your HostNed portal, ensuring your domain is renewed on time is critical.
- Keep your contact information updated: Ensure your contact details in your HostNed client portal are current so you always receive important notifications.
We aim to make your domain and hosting management as smooth and secure as possible. If you have any questions about these renewal notices or need assistance renewing your domain, please don't hesitate to contact our support team.
#5
Announcements / New Guide: Hosting Multiple Do...
Last post by Dynaweb - May 26, 2025, 06:57:56 AMSave time and money by hosting more than one domain on a single hosting plan! Our new support article walks you through setting up addon domains in cPanel, with tips on DNS, email, and avoiding common pitfalls.
Have another domain you want to use for a promotional site, microsite, or small web project—but don't want the cost or hassle of a second hosting plan? Great news: you can host multiple domains on your existing HostNed account!
We've just published a new Knowledge Base article that explains exactly how to do this using Addon Domains in cPanel.
✅ Step-by-step instructions
✅ DNS setup help
✅ How to add email for the new domain
✅ SSL info
✅ And a helpful warning about mixing forwarders with inboxes
Check out the full guide here →
https://my.hostned.com/forum/web-hosting/how-to-host-multiple-domains-on-a-single-hosting-account-addon-domains/
As always, if you get stuck or want us to double-check anything for you, just reach out to support—we're happy to help!
#6
Web Hosting / How To Host Multiple Domains o...
Last post by Dynaweb - May 26, 2025, 06:46:26 AMWant to host more than one domain on your existing HostNed web hosting account? You can! This is commonly done using what's called an Add-on Domain.
This guide will walk you through how to add an additional domain (e.g., for a promotional website) to your existing cPanel-based hosting account. (Plesk-based accounts offer the same but steps are a little different.) The number of additional domains you can add on depends on your level of hosting plan.
Step-by-Step: Setting Up an Add-on Domain
1. Register the New Domain
Make sure the domain you want to use is registered. (You can have it registered with us, our partner DomainsNed, or most any 3rd party registrar.)
2. Log In to Your Hosting Control Panel
Visit your cPanel by going to:
https://yourdomain.com/cpanel
(Replace "yourdomain.com" with the domain of your main hosting account.)
3. Add the Domain in cPanel
In cPanel:
Go to DOMAINS → Create a New Domain
– Enter the domain name (e.g., examplepromo.com)
– Leave "Share Document Root" unchecked
– The "Subdomain" field will auto-fill—this is just for internal reference and can be left as-is
4. Update DNS at Your Registrar
Log in to your domain registrar (HostNed or 3rd party) and update the domain's nameservers to point to HostNed.
You can use either of the following pairs:
Primary option:
Alternate option (cPanel accounts only):
5. Upload Your Website Files
Once the domain is added and DNS has propagated, upload your new site files to the folder created (usually something like:
/public_html/examplepromo.com/)
6. (Optional) Set Up Email for the New Domain
In cPanel:
Go to EMAIL → Email Accounts
Click CREATE, select the new domain from the dropdown, and fill in the rest.
7. SSL Certificate
SSL (https://) is automatically provided and installed for free (now with our SSH Series hosting plans). Just give it a little time to go live, typically within a few hours after setup.
That's it. You're all se up!
Note: Add-on domains are supported on SSH Plus level plans and higher. See our full offering of hosting plans here.
Need Help?
Just contact HostNed Support with your new domain name, and we'll be glad to assist you further or check the setup.
Also inquire with us if you have one of our older hosting plans, you will really enjoy the power and convenience of our new updated plans.
This guide will walk you through how to add an additional domain (e.g., for a promotional website) to your existing cPanel-based hosting account. (Plesk-based accounts offer the same but steps are a little different.) The number of additional domains you can add on depends on your level of hosting plan.
Step-by-Step: Setting Up an Add-on Domain
1. Register the New Domain
Make sure the domain you want to use is registered. (You can have it registered with us, our partner DomainsNed, or most any 3rd party registrar.)
2. Log In to Your Hosting Control Panel
Visit your cPanel by going to:
https://yourdomain.com/cpanel
(Replace "yourdomain.com" with the domain of your main hosting account.)
3. Add the Domain in cPanel
In cPanel:
Go to DOMAINS → Create a New Domain
– Enter the domain name (e.g., examplepromo.com)
– Leave "Share Document Root" unchecked
– The "Subdomain" field will auto-fill—this is just for internal reference and can be left as-is
4. Update DNS at Your Registrar
Log in to your domain registrar (HostNed or 3rd party) and update the domain's nameservers to point to HostNed.
You can use either of the following pairs:
Primary option:
Code Select
yin.ssl1.us
yang.ssl1.us
Alternate option (cPanel accounts only):
Code Select
ns1cp3.ssl1.us
ns2cp3.ssl1.us
5. Upload Your Website Files
Once the domain is added and DNS has propagated, upload your new site files to the folder created (usually something like:
/public_html/examplepromo.com/)
6. (Optional) Set Up Email for the New Domain
In cPanel:
Go to EMAIL → Email Accounts
Click CREATE, select the new domain from the dropdown, and fill in the rest.
7. SSL Certificate
SSL (https://) is automatically provided and installed for free (now with our SSH Series hosting plans). Just give it a little time to go live, typically within a few hours after setup.
That's it. You're all se up!
Note: Add-on domains are supported on SSH Plus level plans and higher. See our full offering of hosting plans here.
Need Help?
Just contact HostNed Support with your new domain name, and we'll be glad to assist you further or check the setup.
Also inquire with us if you have one of our older hosting plans, you will really enjoy the power and convenience of our new updated plans.
#7
Announcements / Updated: Using Gmail With Your...
Last post by Dynaweb - May 21, 2025, 08:39:56 AM #8
Email and Webmail / Email Cleanup Policy & Best Pr...
Last post by Dynaweb - May 21, 2025, 07:14:46 AMTo maintain reliable service performance and reduce storage bloat, HostNed is implementing a routine cleanup policy for email folders that commonly accumulate unnecessary data over time.
What's Changing?
Beginning June 1 2025, the following automatic cleanup policy will apply to all shared hosting accounts:
What You Should Do
To avoid losing important messages:
Email Management Tips
Why This Matters
Keeping your email storage under control not only improves performance for you but also for others on the shared system. It also helps:
📩 Need Help?
If you'd like personalized advice or need help configuring your email client, feel free to open a support ticket through the member portal at https://my.hostned.com
What's Changing?
Beginning June 1 2025, the following automatic cleanup policy will apply to all shared hosting accounts:
- Trash Folder: Messages older than 21 days will be automatically deleted
- Spam (Junk) Folder: Messages older than 21 days will be automatically deleted
What You Should Do
To avoid losing important messages:
- Regularly empty your Trash and Spam folders manually if you want more immediate cleanup.
- Move important messages out of Spam or Trash and back into your Inbox or a custom folder.
- Create backups of your email by using a mail client (like Outlook, Thunderbird, or Apple Mail) that supports local storage or exporting.
- Set filters or rules in webmail or your email client to sort mail more effectively.
Email Management Tips
- Archive old messages to custom folders if you want to keep them longer-term.
- Unsubscribe from unwanted newsletters or mass mailings to reduce inbox clutter.
- Check Spam regularly in case legitimate emails land there by mistake.
- Enable Auto-Expunge in your email client if available, to streamline the cleanup process.
Why This Matters
Keeping your email storage under control not only improves performance for you but also for others on the shared system. It also helps:
- Improve mail server speed and reliability
- Reduce the risk of full mailboxes or delivery failures
- Maintain compliance with industry standards for good mailbox hygiene
📩 Need Help?
If you'd like personalized advice or need help configuring your email client, feel free to open a support ticket through the member portal at https://my.hostned.com
#9
Billing / Why Do I Still See the Old Web...
Last post by Dynaweb - May 03, 2025, 11:07:34 AMQuestion: My HostNed account was recently suspended and has now been reactivated. However, when I visit my website, I'm still seeing the old content (like the Plesk or cPanel default page) instead of my actual website. Why is this happening?
Answer: This issue is most commonly caused by your web browser storing an older version of the website in its cache. Even though your website files are now live on our servers, your browser might be displaying the previously saved version. This is a normal behavior designed to make browsing faster, but it can sometimes lead to displaying outdated content after changes or service interruptions.
Here are the steps you can take to resolve this:
1. Perform a Hard Refresh (Force Reload):
This forces your browser to bypass its cache and request the latest version of the page directly from our server.
2. Clear Your Browser's Cache and Cookies:
If a hard refresh doesn't work, you may need to clear your browser's stored files and cookies for your website. Here's how to do it in some popular browsers:
3. Try Incognito/Private Browsing Mode:
Opening your website in a private or incognito window bypasses your browser's existing cache and cookies.
4. Restart Your Browser:
After clearing your cache and cookies, close and reopen your web browser completely.
5. Restart Your Computer and Router (Less Common):
In some rare instances, a local network issue or a persistent cache within your operating system might be involved. Restarting your computer and your internet router can sometimes resolve these unusual cases.
If the issue persists after trying all these steps, please don't hesitate to contact our support team, and we'll be happy to investigate further.
Answer: This issue is most commonly caused by your web browser storing an older version of the website in its cache. Even though your website files are now live on our servers, your browser might be displaying the previously saved version. This is a normal behavior designed to make browsing faster, but it can sometimes lead to displaying outdated content after changes or service interruptions.
Here are the steps you can take to resolve this:
1. Perform a Hard Refresh (Force Reload):
This forces your browser to bypass its cache and request the latest version of the page directly from our server.
- Windows/Linux (Chrome, Firefox, Edge): Press Ctrl + Shift + R or Ctrl + F5 while on your website.
- Mac (Chrome, Safari): Press Cmd + Shift + R while on your website.
2. Clear Your Browser's Cache and Cookies:
If a hard refresh doesn't work, you may need to clear your browser's stored files and cookies for your website. Here's how to do it in some popular browsers:
- Google Chrome:
- Click the three vertical dots (the "Customize and control Google Chrome" menu) in the top-right corner.
- Hover over More tools and then click Clear browsing data.
- At the top, select a Time range. To clear everything, choose All time.
- Make sure the boxes next to Cookies and other site data and Cached images and files are checked.
- Click the Clear data button.
- Mozilla Firefox:
- Click the three horizontal lines (the "Menu" button) in the top-right corner.
- Click Options.
- Select Privacy & Security on the left sidebar.
- In the "Cookies and Site Data" section, click Clear Data....
- Make sure the boxes next to Cached Web Content and Cookies and Site Data are checked.
- Click Clear.
- Microsoft Edge:
- Click the three horizontal dots (the "Settings and more" menu) in the top-right corner.
- Go to Settings.
- Select Privacy, search, and services in the left sidebar.
- Under "Clear browsing data," click Choose what to clear.
- Select a Time range (e.g., "All time").
- Make sure the boxes next to Cached images and files and Cookies and other site data are checked.
- Click Clear now.
- Safari (Mac):
- Click Safari in the menu bar, then select Preferences.
- Go to the Privacy tab.
- Click Manage Website Data....
- Find your website in the list, select it, and click Remove. You can also click Remove All, but be aware this will clear data for all websites.
- Click Done.
3. Try Incognito/Private Browsing Mode:
Opening your website in a private or incognito window bypasses your browser's existing cache and cookies.
- Chrome: Click the three vertical dots (menu) > New Incognito window.
- Firefox: Click the three horizontal lines (menu) > New Private Window.
- Edge: Click the three horizontal dots (menu) > New InPrivate window.
- Safari: Click File > New Private Window.
4. Restart Your Browser:
After clearing your cache and cookies, close and reopen your web browser completely.
5. Restart Your Computer and Router (Less Common):
In some rare instances, a local network issue or a persistent cache within your operating system might be involved. Restarting your computer and your internet router can sometimes resolve these unusual cases.
If the issue persists after trying all these steps, please don't hesitate to contact our support team, and we'll be happy to investigate further.
#10
Web Hosting / Why Do I Still See the Old Web...
Last post by Dynaweb - May 03, 2025, 11:05:30 AMQuestion: I've recently made changes to my website files through the HostNed control panel (File Manager, FTP, etc.), but when I visit my website in a browser, I'm still seeing the old version. Why aren't my changes showing up?
Answer: This is a very common occurrence and is almost always due to your web browser storing an older version of your website in its cache. Browsers save website files (like images, CSS, and HTML) locally to speed up loading times on subsequent visits. When you make changes, your browser might still be displaying the cached version instead of fetching the latest files from our server.
Here are the steps you can take to see your recent website updates:
1. Perform a Hard Refresh (Force Reload):
This is the quickest way to try and bypass your browser's cache for the specific page you're viewing.
2. Clear Your Browser's Cache and Cookies:
If a hard refresh doesn't work, you may need to clear your browser's stored files and cookies for your website or even for all websites. Here's how to do it in some popular browsers:
3. Try Incognito/Private Browsing Mode:
Opening your website in a private or incognito window bypasses your browser's existing cache and cookies, forcing it to load the latest version from the server.
4. Restart Your Browser:
After clearing your cache and cookies, close and reopen your web browser completely.
5. Check for Server-Side Caching (Less Common for Immediate Changes):
While less likely to cause immediate delays after you've directly edited files, some websites utilize server-side caching mechanisms (like caching plugins in WordPress or server-level caching). If you've recently made changes and they are still not appearing after trying the browser steps, you might need to clear any server-side caches as well. If you are using a CMS like WordPress, check for caching plugin settings. If you're unsure, you can contact our support team to inquire about server-side caching.
In most cases, a hard refresh or clearing your browser's cache will resolve this issue and allow you to see your latest website changes. If you continue to experience problems after trying these steps, please don't hesitate to contact our support team, and we'll be happy to assist you further.
Answer: This is a very common occurrence and is almost always due to your web browser storing an older version of your website in its cache. Browsers save website files (like images, CSS, and HTML) locally to speed up loading times on subsequent visits. When you make changes, your browser might still be displaying the cached version instead of fetching the latest files from our server.
Here are the steps you can take to see your recent website updates:
1. Perform a Hard Refresh (Force Reload):
This is the quickest way to try and bypass your browser's cache for the specific page you're viewing.
- Windows/Linux (Chrome, Firefox, Edge): Press Ctrl + Shift + R or Ctrl + F5 while on your website.
- Mac (Chrome, Safari): Press Cmd + Shift + R while on your website.
2. Clear Your Browser's Cache and Cookies:
If a hard refresh doesn't work, you may need to clear your browser's stored files and cookies for your website or even for all websites. Here's how to do it in some popular browsers:
- Google Chrome:
- Click the three vertical dots (the "Customize and control Google Chrome" menu) in the top-right corner.
- Hover over More tools and then click Clear browsing data.
- At the top, select a Time range. To ensure you see the latest changes, try clearing data for Last hour or Last 24 hours. If that doesn't work, you can try All time.
- Make sure the boxes next to Cookies and other site data and Cached images and files are checked.
- Click the Clear data button.
- Mozilla Firefox:
- Click the three horizontal lines (the "Menu" button) in the top-right corner.
- Click Options.
- Select Privacy & Security on the left sidebar.
- In the "Cookies and Site Data" section, click Clear Data....
- Make sure the boxes next to Cached Web Content and Cookies and Site Data are checked.
- Click Clear.
- Microsoft Edge:
- Click the three horizontal dots (the "Settings and more" menu) in the top-right corner.
- Go to Settings.
- Select Privacy, search, and services in the left sidebar.
- Under "Clear browsing data," click Choose what to clear.
- Select a Time range (try Last hour or Last 24 hours first, then All time if needed).
- Make sure the boxes next to Cached images and files and Cookies and other site data are checked.
- Click Clear now.
- Safari (Mac):
- Click Safari in the menu bar, then select Preferences.
- Go to the Privacy tab.
- Click Manage Website Data....
- Find your website in the list, select it, and click Remove. You can also click Remove All, but be aware this will clear data for all websites.
- Click Done.
3. Try Incognito/Private Browsing Mode:
Opening your website in a private or incognito window bypasses your browser's existing cache and cookies, forcing it to load the latest version from the server.
- Chrome: Click the three vertical dots (menu) > New Incognito window.
- Firefox: Click the three horizontal lines (menu) > New Private Window.
- Edge: Click the three horizontal dots (menu) > New InPrivate window.
- Safari: Click File > New Private Window.
4. Restart Your Browser:
After clearing your cache and cookies, close and reopen your web browser completely.
5. Check for Server-Side Caching (Less Common for Immediate Changes):
While less likely to cause immediate delays after you've directly edited files, some websites utilize server-side caching mechanisms (like caching plugins in WordPress or server-level caching). If you've recently made changes and they are still not appearing after trying the browser steps, you might need to clear any server-side caches as well. If you are using a CMS like WordPress, check for caching plugin settings. If you're unsure, you can contact our support team to inquire about server-side caching.
In most cases, a hard refresh or clearing your browser's cache will resolve this issue and allow you to see your latest website changes. If you continue to experience problems after trying these steps, please don't hesitate to contact our support team, and we'll be happy to assist you further.